Pretty interesting for me considering that I have a really bad memory for functions, I use to program with the reference/module open and autocompletion does help, but having this is good.
What worries to me is the fact that Kite uses internet to be more accurate on what you type, so, it has to query about the modules you are writing, and since it have access to your editor there is a chance it is sending what you type over internet ?.
But let’s face it, it will be the future… the young users will use it because it’s easy face it, new programmers are not used to code without a framework, why?, because it is easier!.
Do you think Kite is fine or is just something that you won’t try?
The artificial pair programmer that shows you examples, documentation, and even fixes simple errors for you.
A few weeks ago, I have to write a program in PyGTK that was supposed to be all the time in the background. This application needs to run over Microsoft Windows, and hide in the notification area, wich in Windows is near to the clock.
One of challenges for me in this application is that as it must run in the background there must be a way to raise it, the most easy way to do it is by force the user to click on the small icon in the notification area, but in this case, that was impossible because the computer don’t have any mouse, everything is done with the keyboard.
Python have several modules that help you to achieve your goals. This week, on my spare time that is getting every day more scarce I spend time figuring out how to create a Python Web Server, I was planing to use it over an application that I’m developing on ICT Consulting. At the end I didn’t use it because I didn’t want a “passive” communication, but probably I will use this code on the CRM Desktop application that we use here.
Anyway, this code may be helpful for you too. I found that creating a small web server is really simple, It starts getting bigger as you add functions to that web server, but the basis is quite simple.
import os
import cgi
import sys
from BaseHTTPServer import HTTPServer, BaseHTTPRequestHandler

class customHTTPServer(BaseHTTPRequestHandler):
        def do_GET(self):
                self.send_response(200)
                self.send_header('Content-type', 'text/html')
                self.end_headers()
                self.wfile.write('<HTML><body>Get!</body></HTML>')
                return

        def do_POST(self):
                global rootnode
                ctype,pdict = cgi.parse_header(self.headers.getheader('Content-type'))
                if ctype == 'multipart/form-data':
                        query = cgi.parse_multipart(self.rfile, pdict)
                self.send_response(301)
                self.end_headers()
                self.wfile.write('Post!')


def main():
        try:
                server = HTTPServer(('',8080),customHTTPServer)
                print 'server started at port 8080'
                server.serve_forever()
        except KeyboardInterrupt:
                server.socket.close()

if __name__=='__main__':
        main()
There are two main methods in our small server: do_GET and do_POST, you can figure out what this methods do. Get is quite simple, Post is used to send data to the server, as an example, the file uploading. This is done via POST and many times using “multipat/form-data” as the content type. The Post method here handles that.
Now that you have a custom server, how can you check it?, well, to check GET you can call it from the web browser. For the POST stuff, you can create a simple web form and using your web browser as “action” on it. However, this code can help you:
import urllib2
import urllib
import time
import httplib, mimetypes

HOST = '127.0.0.1'
PORT = '8080'

def post_multipart(host, port, selector, fields, files):
        """
        Post fields and files to an http host as multipart/form-data.
        fields is a sequence of (name, value) elements for regular form fields.
        files is a sequence of (name, filename, value) elements for data to be uploaded as files
        Return the server's response page.
        """
        content_type, body = encode_multipart_formdata(fields, files)
        h = httplib.HTTP(host, port)
        h.putrequest('POST', '/cgi-bin/query')
        h.putheader('content-type', content_type)
        h.putheader('content-length', str(len(body)))
        h.endheaders()
        h.send(body)
        #errcode, errmsg, headers = h.getreply()
        h.getreply()
        return h.file.read()

def encode_multipart_formdata(fields, files):
        """
        fields is a sequence of (name, value) elements for regular form fields.
        files is a sequence of (name, filename, value) elements for data to be uploaded as files
        Return (content_type, body) ready for httplib.HTTP instance
        """
        BOUNDARY = '----------ThIs_Is_tHe_bouNdaRY_

Did you like this?, don't forget to share!

        CRLF = '\r\n'
        L = []
        if fields:
                for (key, value) in fields:
                        L.append('--' + BOUNDARY)
                        L.append('Content-Disposition: form-data; name="%s"' % key)
                        L.append('')
                        L.append(value)
        if files:
                for (key, filename, value) in files:
                        L.append('--' + BOUNDARY)
                        L.append('Content-Disposition: form-data; name="%s"; filename="%s"' % (key, filename))
                        L.append('Content-Type: %s' % get_content_type(filename))
                        L.append('')
                        L.append(value)
        L.append('--' + BOUNDARY + '--')
        L.append('')
        body = CRLF.join(L)
        content_type = 'multipart/form-data; boundary=%s' % BOUNDARY
        return content_type, body

def get_content_type(filename):
        return mimetypes.guess_type(filename)[0] or 'application/octet-stream'

def test():
        print  post_multipart(HOST, PORT, 'markuz',
                                        ( ('username','markuz'),  ('another_field','another value')),
                                        (('query','query','Query'), ),
                                   )

if __name__ == '__main__':
     test()
This time I’m going to talk about putting an image as the application background in Gtk. In Gtk we are used to leave the colors of the application to the theme, but sometimes we will need to use an image as background. I already wrote how to draw a pixbuf in a gtk.DrawingArea (Esp), we could use that, but we will “draw” directly on the widget window instead.
Yes, I said the widget’s window instead the widget itself. You should know that every widget that has been packed in a container has a gtk.gdk.window object and is the responsible for containing your widget. Well, we can draw on that object.
What we need is to create a simple gtk.gdk.Pixbuf and call the gtk.gdk.window.draw_pixbuf method using your widget.window object on the expose-event.
It is just a window with an HBoxButton as container and a Button in the middle. The button draws normal, but the HButtonBox is drawing its gtk.gdk.window with a pixbuf.
This time I’m about to talk about lazy object, I called like that because they are more or less similar to what we use in lazy treeviews (In Gtk) where the Tree shows expanders but didn’t load the child nodes until you expand the node). What I want to do is create objects and count them, but don’t load any data until I need it.
Why would I need this?. Well. I’m currently writing a program for my employer, this program load a list of customers and shows how many accounts it has. As this accounts are kind of complex I create an object for them. This object is responsible for load/save the data for it, and any data you need is accessed via properties.
In my first approach, the object was loading the data as soon as the constructor was called, but sometimes I never access to any info in that object, remember, a customer may have many (and I mean really many) accounts, then why load all the data if there is a chance that I’ll never use it?. Well, that is because there is a chance that I have to use that data.
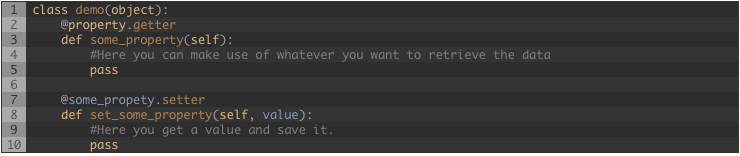
Then how could I create the object and then load the data when somebody require it?. That may be easy, may not. :-). One approach is making use of python properties. Just create the object and when someone want to use a “value” from the object use the property to retrieve the data, process it and then return a value. A simple property may be defined like this:
I just create a class “demo” and the property “some_property”, every time you use this:
Python will call the method get_some_property allowing you to do your trick. But if you have an object with more and more properties is better to get all data at one time and then just use properties to return a piece of it. You could call a method on every property if the data container is empty but for me it is not the best.
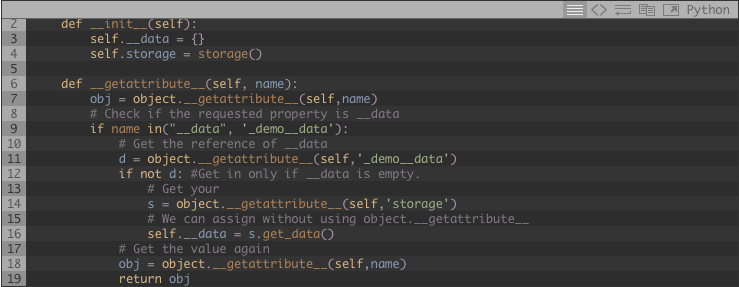
What you could do, is get the data the first time you need it. But, how could I know when a property/variable is requested on my object?
Well, Python classes have several reserved methods, and one of them is __getattribute__. This method let you handle every request to any property/class variable in your object.
With this you can dig in your object to know if the container is empty, and if it is empty fill it with data before returning the property value :-).
Lets say that the demo object have a __data dictionary containing the data. and propeties look into it for the right value, it also have a reference to the storage layer called storage.
Pay attention that I used object.__getattribute__ instead self.property, if I use self.property it will call self.__getattribute__ and will cause a recursion exception.
With this, we can create a great number of objects quickly and reducing the memory footprint. The downside is that getting the data will be a lot expensive if we require the data of all (or several) objects at once.
How would you do it?, let me know in the comments.
find is a great tool to find things, but not only to find them, but to work on them. I have a small collection of music, which I presume at some point will be removed from my computer hard drive (maybe if I can get a new one it won’t be there at all) because I mostly listen to music from internet and I have a copy of the music in a external hard drive.
Today I imported the folder where the music is to iTunes again, and it created playlists that I don’t remember to have them before. That is because there were several m3u files there (winamp playlists), there are around 5k files in that directory tree and I don’t want to spend my time looking for m3u files, so, let the computer do the job.
With find is easy to find files, not by their name but by their type the f is for file.
find . -type f
Ok, but that will include all the “mp3” which are files, so if I make use of -iname to find by name, how can I do the opposite?, well, like in most programming languages, you can negate by using the exclamation symbol !.
So.. I had this issue where I have to replace stuff in the code where the text is splitted across several lines, this is basically because the string is too long and we usually keep the 80 characters width in the code (PEP-8) but this also works in HTML where for example, comments are splitted across several lines.
Let’s say that I want to remove the call to a function that process a text, the most common function that process text is the one everyone uses for translations: _(). The easy way is just to try a simple search and replace in vim:
:%s/_(\(.\{-}\))/\1/gc
Which will replace search for something like _("Translate this") and will leave it like this: "Translate this". the :%s part indicates that we want to search across the whole file, / is the delimiter, there are three delimiters, the pattern, the replacement and operation flags. Since we want to match _(.*) but we want to preserve what’s inside the parenthesis we need to create a backreference and we need to surround that between \( and \). The dot . matches every character except new lines. Please note that we use \{-} instead of the most common * (asterisk) for “one or more” occurrences. This is because \{-} will match as few as possible, while * is too greedy and will stop at the last occurrence. Then we set the replacement string, we wanted to leave the string intact so we just use the backreference: \1 is the first backreference, \2 for the second and so on. The last gc are there just to ask you for every match, but you can just press “a” to apply to everyone.
If you want to search/replace multiple lines, then you can just use the \_. pattern in vim, that pattern matches every character including new lines.
:%s/_(\(\_.\{-}\))/\1/gc
So, for example:
_("This is a text"
" That is splitted across"
" several lines").upper()
after :%s/_(\(\_.\{-}\))/\1/gc will be
"This is a text"
" That is splitted across"
" several lines".upper()
The main problem when compiling is the tons of disk access that compile involves from compiling, linking, stripping etc… if you have a regular hard disk you know this may take a lot of time, most if the project is large. If you have an SSD the problem is not the speed, but still the lots of read/write access even when SSDs are pretty much more reliable that they were years ago.
A simple fix is to use ram disk. I’m not going to tell you how to do it in linux, because in linux you basically mount tmpfs in a directory and you are done, but in OS X this may be a bit tricky. In particular if we talk about macports.
Macports build directory is /opt/local/var/macports/build, so we need to mount a ramdisk here. But first we need to create it.
hdiutil attach -nomount ram://2097152
/dev/disk10
That should create a ramdisk with about 1GB, if you want to use less or more ram you can of course tune the “ram” parameter to fit what’s best for you, it doesn’t means the size in bytes/kbytes, it mean the number of 512 bytes sectors. Then format and mount in /opt/local/var/macports/build:
newfs_hfs /dev/disk10
sudo mount -t hfs /dev/disk10 /opt/local/var/macports/build
And you are done, just use macports as usual. Please note that there might be some ports that fails to build because some of them expect the build directory to be in the same storage .
After you are done compiling you probably want to delete that ramdisk, just use hdiutil detach $dev for that.
Quite often I found in vim that I would like the current buffer in a new tab, I use a lot the vertical and horizontal splits in vim, then I reach the limit (my screen limit) for the vertical/horizontal splits, this means: if I add a new vertical split the code looks ugly even if it respects the 80 columns width, or if add a new horizontal split there would be just too few lines that is not worth to keep the buffer.
Then I used open a new tab, type
:e
then type the path to the buffer I like to edit. Until now, now I open a new tab, then type
:ls
check then number of the buffer I want in this new tab and then type
:bX
being “X” the number of the buffer, ej “:b2“. Another trick is to type
The last couple of days I’ve been working with Kivy. For those that don’t know is a framework to create applications in graphical environments and in multiple platforms, all of these in the most easy to use programming language: Python, (And I mean programming language, JavaScript doesn’t count).
Well, its interesting to work with it, basically because I have the influence of GTK+ and having no windows but calling to widgets creates some confusion. Also, there is this Kivy language which is something like what Glade is In GTK but a lot easier to read (actually everything is easier to to read than XML).
I’m just starting to do this, this post is not a “how to do things in Kivy”, but I hope I can write some of those in the next weeks.
This website stores cookies on your computer. These cookies are used to provide a more personalized experience and to track your whereabouts around our website in compliance with the European General Data Protection Regulation. If you decide to to opt-out of any future tracking, a cookie will be setup in your browser to remember this choice for one year.