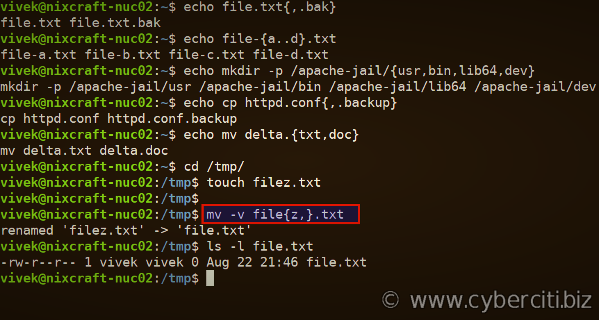
Just a nice post with a some nice examples about how to use brace expansion in bash. Assuming you use the shell and bash script to automate your tasks this is a nice reference.
Continue reading ![]()
Just a nice post with a some nice examples about how to use brace expansion in bash. Assuming you use the shell and bash script to automate your tasks this is a nice reference.
Continue reading ![]()
Este es un “re-post” en español de este otro articulo que escribí en inglés: Python trick: How to make lazy objects?. Si ya leíste aquel articulo igual te invito a que leas este, compares y compartas.
Esta vez voy a hablar de los “lazy objects”, los he llamado así porque son mas o menos similar a lo que usaba con los “Lazy treeviews” en GTK donde el árbol muestra los expansiones pero no se cargan los nodos hijos hasta que expandes el nodo. Lo que quiero entonces es crear objetos que sirvan para contar, que tengan un tipo de dato, pero que no carguen nada de datos hasta que se necesite.
¿Por que haría esto?, bueno, actualmente estoy trabajando en un programa que muestra una lista de clientes y muestra cuántas cuentas tiene, estas cuentas son algo complejas así como crear el objeto para representarlas. Este objeto es responsable de cargar y guardar datos, y cualquier dato necesario es accesado via “propiedades”.
En mi primer intento, el objeto cargaba con los datos tan pronto como el constructor era llamado, pero a veces nunca accedía a la información en dicho objeto, recuerden, un client puede tener muchas (y me refiero, muchas muchas) cuentas, entonces, ¿por que cargar todos los datos si hay una oportunidad de que nunca voy a usar ese dato?. Bueno, está ahí por qué también hay una oportunidad de que voy a necesitar ese dato.
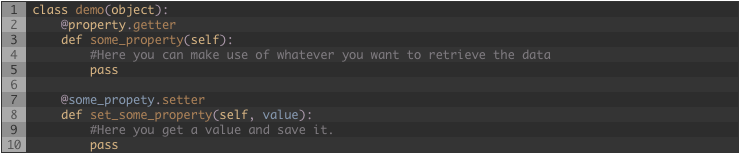
Entonces, como podría crear un objeto y despues cargar los datos cuando alguien los requiera?. Eso podría ser fácil… tal vez no ?. Una aproximación es hacer uso de las “propiedades” de Python, crear el objeto y cuando alguien necesite un valor de este objeto entonces usar la propiedad para obtener el dato, procesarlo y retornar un valor, una propiedad se puede definir así:
He creadola clase “demo” y la propiedad “some_property”.

Python va a llamar el método get_some_property permitiéndote hacer el truco. Pero si tienes un objeto con mas y mas propiedades es mejor obtener todos los datos de una vez y solo usar propiedades para regresar un pedazo de el. Podrías llamar a un método en cada propiedad si el contenedor está vacío pero para mi no es lo mejor.
Lo que podemos hacer, es obtener los datos la primera vez que los necesites, pero como sabría que datos/variables son requeridas en mi objeto?.
Bueno, pues las clases de Python tienen ciertos métodos, los llamados “magic methods”, uno de ellos es __getattribute__. Este método te permite manejar cada petición a cualquier propiedad o variable de clase en tu objeto.
Con esto puedes buscar en tu objeto, saber si el contenedor esta vacío y si está vacío entonces llenarlo con datos antes de retornar el valor de la propiedad ?
Digamos que el objeto demo tiene un diccionario llamado __data donde almacenaremos la información necesaria, también tenemos propiedades que buscarán por esta información. también tiene una referencia a la capa de almacenamiento.
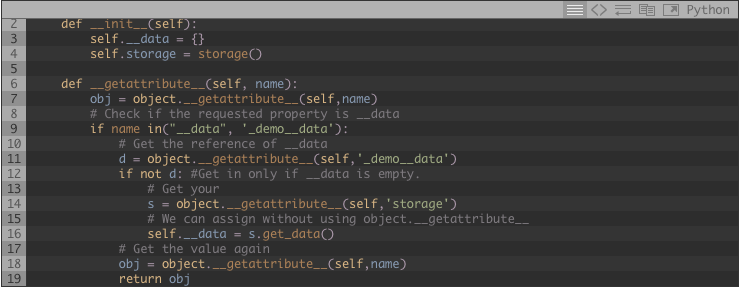
Presta atención que he usado object.__getattribute__ en lugar de self.property, si usara self.propertyesto llamaría a self.__getattribute__ y esto causaría una excepción de recursión.
Con eso, podemos crear un gran numero de objetos de forma rápida, al mismo tiempo que reducimos el uso de memoria. La paga es que obtener los datos será mas caro si llegaremos a requerir todos los datos de todos los objetos al mismo tiempo.
![]()
Este es el primero, cuando nos cuentan de un proyecto lo primero que hacemos es empezar a divagar, es mas, ni bien nos estan terminando de contar los requerimientos y ya hemos escogido el lenguaje, el framework y a veces hasta el pilón.
Siempre es importante pensar el proyecto, ¿es viable?, hay que investigar y planear, entonces, escribe, valida los resultados y modifica.
También este es un error, a veces sobrepasamos demasiado las cosas y terminamos creando un monstruo porque “en el futuro puede que llegue a necesitar esta característica”, es mejor implementar algo simple y que logre el propósito aunque despues tengamos que reescribr parte del código.
La mayor parte del tiempo leemos código, se lee mas de lo que se escribe, si quieres entender que hace tu código dentro de 6 meses es mejor que apliques las convenciones para escribir buen código.
Este va un poco de la mano de la primera, a veces creemos que ya tenemos la solución porque fue lo primero que se nos vino a la mente, pero a veces las soluciones pueden ser mas elegantes y mas simples si las pensamos un poco mas.
No somos un sabelotodo, si hay algo que no sabes entonces googlealo, incluso, si lo sabes pero crees que puede hacerse de una forma mejor, igual, googlealo.
Aprende los “pros” y los “contras” de los tipos de datos de tu lenguaje de programación a usar, algunos te darán flexibilidad y facilidad de usar, algunos te darán velocidad y mejor uso de los recursos.
A veces en nuestro intento de arreglar algo o de agregar una nueva característica dejamos nuestro código hecho un cochinero, siempre procura dejarlo un poco mejor de cómo lo encontraste.
Usa un IDE que te ayude a formatearlo tu código, con esto ganaras mucho tiempo al dejar un código mas legible.
A veces por querer ahorrarnos un poco de código y de pensar, metemos mas y mas dependencias a nuestros programas, total, el CPU en el que va a correr lo soporta, son XX núcleos y 1TB de RAM, debe funcionar perfecto.
Tal vez sí, pero si puedes quitarte una dependencia y hacer ese poquito de código por tu cuenta, hazlo.
![]()
I use macOS as the main OS in my computer, actually the only one in my personal computer, but I have other computers with Linux as desktop too, but macOS is the one that I use the most. And over the time I have learned how to get more from the OS as the default installation.
For example, I currently don’t use Spotlight, I use another tool called “Alfred” you all might know it.
Spotlight was a good thing back in the days were it was basically a search tool for the OS living in the corner, where nobody looks. But it was not good as a some sort of launcher, and having all my apps in the Dock was not a good idea. Then Alfred arrived and it came with other functionality like workflows and search in places where spotlight just don’t do, also the fuzzy word search (like GC and expect to get Google Chrome) works very well.
If Apple were smart enough to buy Alfred and use it instead of their current implementation of spotlight (GUI) that would make macOS much more useful.
Email is my preferred way to send messages, pictures, documents to friends and colleagues, but I don’t want to keep the whole app open, It would be create to have a mini-composer ready to be used whenever you want to send a quick email.
In which cases you would want to use “Quick-email” ?.. well, in the “share” button there is “Mail” and it opens the whole app, you can use that mini-composer, you don’t want to read email, you want to send.
Another example, you just remembered you need to ask for some help to a partner, a quick workflow in “Alfred” could launch that mini-composer, write a small email, hit the send button (or a shortcut-key) and you are done.
Basically the same thing as Quick send mail but to add things in the calendar, you can quickly view your day or tomorrow in the today widgets.
Full Screen mode is for me one of the best things that macOS have in the windows corner. I work mostly with full screen apps, this because it let me focus on the current task, is less cluttered and digging a bit on the os side, it allows background apps to take a nap and free resources.
Sometimes I want to open a new tab of safari but in a new window, but, it opens in a new fullscreen window, then I have to enter to mission control and then move the window near to the other an attach it to the space where the original window was, then I have a single space with two windows in fullscreen mode.
A quick way to to that would be great, like in the email composer, just open it in fullscreen mode, hit CMD+N and a new window appears next to the current without leaving the current space.
This is common in iOS, you can have one app in flyover mode, is hidden in every space, but when you call it is a floating window in the current space with you can remove from flyover mode and attach to the current spate. wouldn’t that be great?. What if you can have several apps in flyover ? I would put mail in that mode.
![]()
En un post anterior les comenté las buenas prácticas en Python, ahora toca hablar de Django, si bien Django esta hecho en el lenguaje Python tiene sus propias convenciones como framework, y seguir estos lineamientos permitirá que tengas proyectos organizados pero sobre todo, que tus compañeros de trabajo (si todos siguen estas recomendaciones) y tu funcionen mejor.
Aquí no hay mucho que decir, estamos hablando de Python y por lo tanto aplican las reglas de estilo de Código de Python, debes escribir siguiendo la PEP8. Django también tiene sus propias convenciones para escribir código, estas las puedes encontrar aquí , coteja con las de Python, verás que son complementarias.
settings.py es uno de los módulos principales en tu app, en el se definen los parámetros con los que ha de funcionar tu aplicación, es importante mantener limpio este módulo, e incluso, quitar lo que no es básico para entender el funcionamiento de la aplicación o moverlo a otro lado.
Recordemos que estamos hablando de Python, podemos hacer nuestro settings.py muy modular, e importar lo que se necesita en el momento. Por ejemplo, las configuraciones de logging , o las configuraciones correspondientes al ambiente de desarrollo que son típicamente diferentes a las de producción.
Rutas
Nuestro ambiente de desarrollo esta en una ruta en el almacenamiento diferente de la que estará en producción, es por ello que debemos evitar usar rutas “duras”, en su lugar debemos referirnos a rutas relativas a una que Python nos proporcionará.
Es común ver en el settings.py la variable BASE_DIR y STATIC_ROOT que son variables donde se define la ruta absoluta del proyecto en disco duro, así como donde se guardan los archivos estáticos en disco duro. Estas variables las podemos definir mejor así:
BASE_DIR = os.path.dirname(__file__)
STATIC_ROOT = os.path.join(BASE_DIR, "static")
En nuestro proyecto veremos un archivo urls.py que no es mas que un módulo que contiene la información de cada una e las URLs dentro de nuestro proyecto. Me ha tocado ver urls.py tan largos como la cuaresma, y no, no es nada bonito tener un módulo asi de grande, sobre todo porque es confuso.
Que podemos hacer entonces?. Bueno, en principio, tener un urls.py en cada app de tu proyecto, de esta forma cada app será independiente, se reducirá el tamaño del archivo principal y te será m as fácil ubicar las urls en caso de agregar/editar/borrar. La otra, en el caso de que nuestra app tenga muchas urls, es modularizar, puedes repartir las urls en mas módulos dependiendo de cada sección dentro de tu app.
Las plantillas en Django están en básicamente en dos lugares, en el directorio base de tu proyecto y en el de cada app, ahí deberá haber un directorio llamado templates. Lo importante aquí es que las plantillas de tu app deben estar en el directorio templates dentro de tu app. Las plantillas “base” o genéricas podrían estar en tu directorio templates en el directorio base.
BASE_DIR/
        /myproject/
                  /settings.py
                  /urls.py
        /templates/
                  /base.html
                  /header.html
                  /footer.html
        /my_app/
               /models.py
               /views.py
               /urls.py
               /admin.py
Lo mismo que con las plantillas. Cada app debe mantener su contenido estático para cada una de ellas, con esto mantienes la independencia de la app y permites que pueda ser usada en otros proyectos.
El contenido estático pueden ser:
Ojo, no se debe confundir el contenido estático con el contenido que sube el usuario final, este contenido que sube el usuario va al directorio “Media”
Estas no están dentro de las convenciones de las buenas prácticas en Django, pero las he usado y me han servido muy bien:
Con esto puedo seccionar las partes de mi app, así tengo Views para cada sección y son generalmente archivos pequeños. Con esto evito tener un “views” de mas de 1000 lineas.
BASE_DIR/
        /myproject/
        /my_app/
               /models.py
               /urls.py
               /admin.py
               /views/
                     /customers.py
                     /products.py
                     /reports.py
Django desde hace buen tiempo ya cuenta con las Class Views. Antes estábamos acostumbrados a que cada vista era una función, pero los Class Views tienen muchas ventajas sobre las funciones.
Lo que mas me gusta es que puedo crear una clase base y solo extender su uso dependiendo de la sección, por ejemplo, tengo la sección Customers, entonces creo una vista básica de “customers”:
class CustomerBasicView(LoginRequiredMixin ,TemplateView):
    template_name = "blank.html"
    # Esta variable de clase se llenará con el valor delcliente en turno.
    customer = None

    def get_context_data(self, *args, **kwargs):
        # Crear el contexto y llenar lo "General"

    def get(self, request, *args, **kwargs):
        # Llamar get_context_data
        # Llamar una función en las clases hijas para complementar el contexto
        # Ejecutar una función anexa a "get" para finalizar get
        # Si no existe dicha función retrnar
        return self.render_to_response(self.context)
Y las demás clases solo necesitan heredar de CustomerBasicView
class Dashboard(CustomerBasicView):
    template_name="customers/dashboard.html"

class View(CustomerBasicVIew):
    template_name="customers/view.html"

class Edit(CusotmerBasicView):
    template_name="customers/edit.html"
Como ven?. Dejaré una explicación mas detallada de esto que hago para otro post. Tal vez mañana.
Si te gustó el articulo, compartelo en tus redes sociales, si tienes algo que agregar con toda confianza hazlo en los comentarios.
![]()
Si hemos usado Django seguro nos hemos enamorado de su forma de hacer formularios, sobre todo los que están relacionados con un modelo, puesto que son simplísimos. Hay que reconocer lo simple de Django, y gracias a esta simplicidad que no busca satisfacer completamente todas las necesidades podemos encontrarnos con situaciones que pues, no se apegan a lo que queremos hacer.
![]()
So, for the people that follows my blog or me in twitter/facebok knows that I usually works on Linux/macOS, when using servers I use to use Linux and I’m a huge fan of the shell. In linux while I enjoy using GNOME/XFCE none of them are my favorite desktop (that’s why I’m using macOS).
One of the things I enjoy with the shell is using SSH (Secure Shell), although is pretty simple (launching a remote shell) there is a post in this blog about re-using the current ssh connection, which I tend to use since I discovered.
But sometimes I need to monitor a server, and then I use several apps, like iftop/nload, etc… and it was pain in the ass opening serveral shells to launch every program.
Then I found tmux, which allows you to have several shells in the same shell, I believe using ncurses but it works!.
So, now I was able to launch a tmux session, create my panes (split the windows) then launch the programs I like, and since tmux will remain even if I close the connection I’m able to start whenever I was before closing the connection.
Now, what happens if I have to restart the server?, or what if the computer I’m monitoring have an issue and shutdown?. Well, I’ll have to start another tmux session again, do the split and launch the program.
Could that be easy to do?. Turns out that there is a way to do that, just create a script and launch tmux asking to do the splits and opening the programs in each pane, something like this:
#!/bin/bash
tmux new-session -d iftop -m20m -F192.168.2.0/24 -i eth1
tmux split-window -h nload eth1
tmux split-window -v nload enp2s0
tmux split-window -v nload eth2
tmux split-window -v
tmux select-pane 0
tmux -2 attach-session -d
Then, after you login with ssh, just run the script. It will create a set of panes and run a command in every pane. Note that this script is just an example, you have to create your own based on it.
I know this is not something new, and my sysadmin friends have been using this for a long time, they sure know better options for tmux, you probably will, if that’s the case I would love you to leave a comment with your tips for tmux or better alternatives.
Did this post was useful to you?, share it!
![]()

NOTE: This is a re-post from the old blog which you can find here
Quick post, this is an ancient method to speed up ssh connections, I’m just leaving it here.
When we use SSH mostly all the times we create a new connection, even if we are connecting with the same host at the same port with the same user. I’ve been using SSH for a long time and to me this was fine, at the end the connection is “pretty” fast and the delay time creating the connection is just ok.
The problem is when you are editing a file that is in the server, whenever I can I use ssh and with that use vim to edit remote files using “scp”, with this I can test the file in the remote server without worrying to sync the file (rsync/scp) manually. At the end I just write back the file in my hard drive if needed.
This is kind of… annoying, vim+scp creates a new connection every time you want to save the file, and it mean a lot of time when editing a file, more if you are like me, saving the freaking file every time I stop writing. So, how can I improve that?.
Well, it turns out its pretty simple. ssh can create a socket (in a predefined place) when connected to a server, with this socket any other ssh instance for the same server+user+port can use this socket and avoid the connection delay. To enable this just add this lines in your ssh config:
Host *
     ControlMaster auto
     ControlPath ~/.ssh/socket/ssh_mux_%h_%p_%r
Just make sure that ~/.ssh/socket/ exists. This will create a socket like ~/.ssh/socket/ssh_mux_localhost_22_markuz and all new connections will use it instead of creating a new connection. Of course, there are some downsides, since the first connection is the only one that is connected, if you loose that connection you’ll disconnect all other ssh instances.You’ll probably do this. So, the way I’ve managed to fix it. Well, it’s kind of simple and of course, it is not magic, just create a master connection whenever you can:
ssh -MNn user@host
Put this somewhere to create it magically (let’s say a script that run in the background), with this you’ll have that ssh connection open, you’ll never have it in the terminal and you’ll not close it until you “kill” that ssh connection.
So, the fix is more like a hack, but works, and helps a lot if you are using a lot of connections to a server.
![]()
 Vagrant is a popular solution to isolate your development environment, while there are many images to use with vagrant the most popular is an Ubuntu server image cooked by HashiCorp. Although with the current computer specs having a virtual machine that uses 512MB in RAM is almost nothing (I bet Google Chrome is wasting more than that now) if you are like me you don’t like to have a Virtual Machine wasting resources.
The main reason of why vagrant images uses that amount of RAM is because they don’t have SWAP, so, if your program/script is using more RAM than what is in the VM the program/script is killed.
You can add a SWAP file by using dd
$ dd if=/dev/zero of=/swapfile bs=1024 count=655360
$ chmod 00600 /swapfile
$ swapon -a
Then add it to /etc/fstab. Pretty simple, but you have a big file that may or may not be used in totality.
A better approach is to use swapspace daemon, it will create a swap space that will grow/shrink as needed. You can install the service in your VM if you already have it working or, add this to your Vagrantfile to have it done automagically.
config.vm.provision "shell", inline: "sudo apt install swapspace -y"
If you do this with a VM already working just shut it down, use vagrant up --provision to run the provision instruction and you are done!.
Having a Swap space allows you to reduce the amount of RAM dedicated to your VM.
![]()
I started to use vagrant to hold my development environment, it helps to keep the development environment isolated, since the app will run on a Linux server, with a specific database engine and probably some other specific modules, I don’t want to clutter my OS with all that stuff. More if I plan to work on another project that maybe, have a dependency on other versions of the same base (legacy Django perhaps?)
![]()
I have multiple blogs, one personal and others for projects that I have, I trust in WordPress because it’s pretty flexible and since version 3.5 the improvements are awesome, making the writing a lot easier.
Still I had a problem, I’m used to the WordPress app for iOS and Mac to avoid having to load the whole page. It is kind of limited (not all plugins are available in the App) but for a quick post it works. Well, the problem I had is that I post mostly to my personal blog, but one of my projects blog was the default and I didn’t knew how to set a default. I event asked for help.
Well, today I discovered that it is possible.
First, you need to go to WordPress.com and go to your account settings.

Then go to the Account settings section.
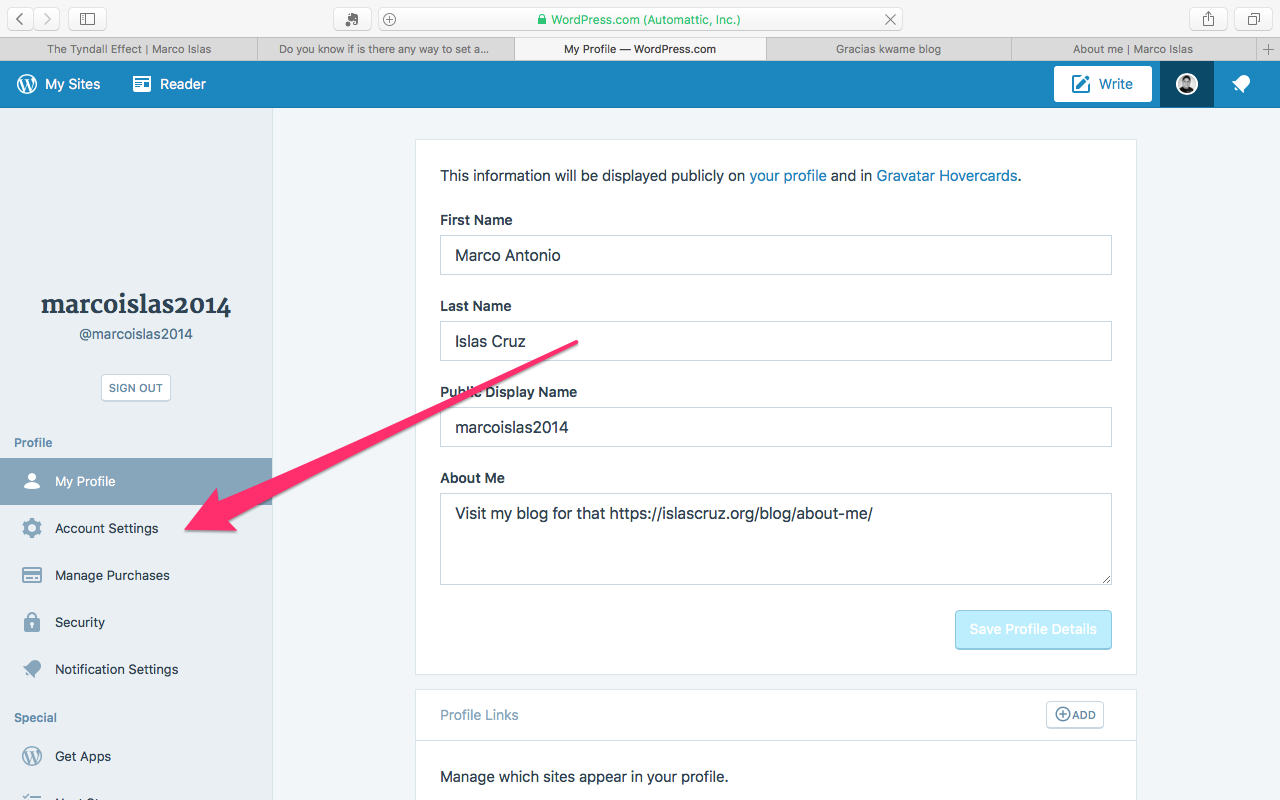
And there just select your default blog. hit save and you are done!.
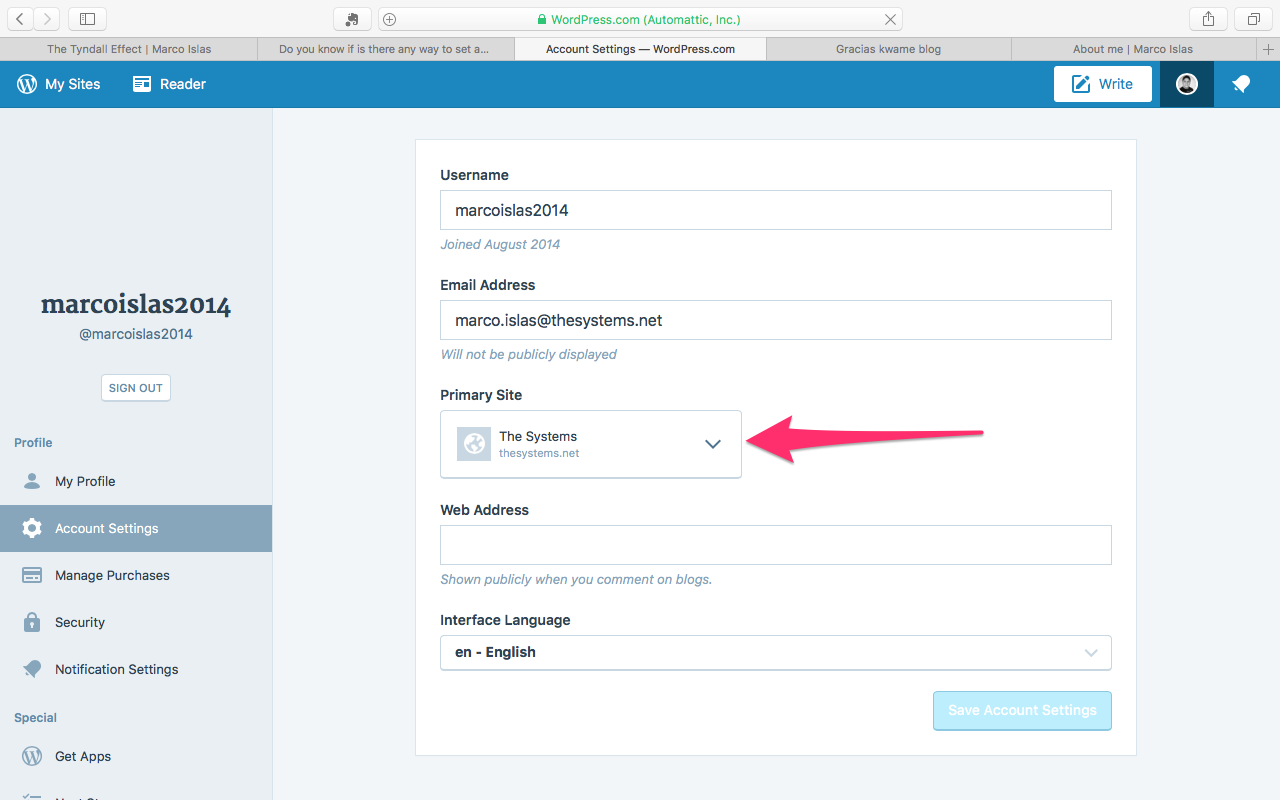
How is that I didn’t do this before?.
![]()
wget -O - http://islascruz.org | \
grep -o '<a href=['"'"'"][^"'"'"']*['"'"'"]' | \
sed -e 's/^<a href=["'"'"']//' -e 's/["'"'"']$//'
![]()
(Repost from old blog)
Python have several modules that help you to achieve your goals. This week, on my spare time that is getting every day more scarce I spend time figuring out how to create a Python Web Server, I was planing to use it over an application that I’m developing on ICT Consulting. At the end I didn’t use it because I didn’t want a “passive” communication, but probably I will use this code on the CRM Desktop application that we use here.
Anyway, this code may be helpful for you too. I found that creating a small web server is really simple, It starts getting bigger as you add functions to that web server, but the basis is quite simple.
import os
import cgi
import sys
from BaseHTTPServer import HTTPServer, BaseHTTPRequestHandler

class customHTTPServer(BaseHTTPRequestHandler):
        def do_GET(self):
                self.send_response(200)
                self.send_header('Content-type', 'text/html')
                self.end_headers()
                self.wfile.write('<HTML><body>Get!</body></HTML>')
                return

        def do_POST(self):
                global rootnode
                ctype,pdict = cgi.parse_header(self.headers.getheader('Content-type'))
                if ctype == 'multipart/form-data':
                        query = cgi.parse_multipart(self.rfile, pdict)
                self.send_response(301)
                self.end_headers()
                self.wfile.write('Post!')


def main():
        try:
                server = HTTPServer(('',8080),customHTTPServer)
                print 'server started at port 8080'
                server.serve_forever()
        except KeyboardInterrupt:
                server.socket.close()

if __name__=='__main__':
        main()
There are two main methods in our small server: do_GET and do_POST, you can figure out what this methods do. Get is quite simple, Post is used to send data to the server, as an example, the file uploading. This is done via POST and many times using “multipat/form-data” as the content type. The Post method here handles that.
Now that you have a custom server, how can you check it?, well, to check GET you can call it from the web browser. For the POST stuff, you can create a simple web form and using your web browser as “action” on it. However, this code can help you:
import urllib2
import urllib
import time
import httplib, mimetypes

HOST = '127.0.0.1'
PORT = '8080'

def post_multipart(host, port, selector, fields, files):
        """
        Post fields and files to an http host as multipart/form-data.
        fields is a sequence of (name, value) elements for regular form fields.
        files is a sequence of (name, filename, value) elements for data to be uploaded as files
        Return the server's response page.
        """
        content_type, body = encode_multipart_formdata(fields, files)
        h = httplib.HTTP(host, port)
        h.putrequest('POST', '/cgi-bin/query')
        h.putheader('content-type', content_type)
        h.putheader('content-length', str(len(body)))
        h.endheaders()
        h.send(body)
        #errcode, errmsg, headers = h.getreply()
        h.getreply()
        return h.file.read()

def encode_multipart_formdata(fields, files):
        """
        fields is a sequence of (name, value) elements for regular form fields.
        files is a sequence of (name, filename, value) elements for data to be uploaded as files
        Return (content_type, body) ready for httplib.HTTP instance
        """
        BOUNDARY = '----------ThIs_Is_tHe_bouNdaRY_

Did you like this?, don't forget to share!

        CRLF = '\r\n'
        L = []
        if fields:
                for (key, value) in fields:
                        L.append('--' + BOUNDARY)
                        L.append('Content-Disposition: form-data; name="%s"' % key)
                        L.append('')
                        L.append(value)
        if files:
                for (key, filename, value) in files:
                        L.append('--' + BOUNDARY)
                        L.append('Content-Disposition: form-data; name="%s"; filename="%s"' % (key, filename))
                        L.append('Content-Type: %s' % get_content_type(filename))
                        L.append('')
                        L.append(value)
        L.append('--' + BOUNDARY + '--')
        L.append('')
        body = CRLF.join(L)
        content_type = 'multipart/form-data; boundary=%s' % BOUNDARY
        return content_type, body

def get_content_type(filename):
        return mimetypes.guess_type(filename)[0] or 'application/octet-stream'

def test():
        print  post_multipart(HOST, PORT, 'markuz',
                                        ( ('username','markuz'),  ('another_field','another value')),
                                        (('query','query','Query'), ),
                                   )

if __name__ == '__main__':
     test()
Did you like this?, don’t forget to share!
![]()
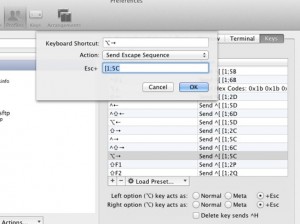
useful way to map “Option+left”/”Option+right” keys in iTerm2 to do by word jump (left and right). Although sending ^[b and ^[f seems to be cleaner.
I’ve been trying to get Option-arrow keys to move by word in iTerm2. I figured out a solution, but it’s weird. If anyone has an explanation or a better way to do this, let me know.
Source: Option-arrow navigation in iTerm2 – BrettTerpstra.com
![]()