
MkzHost tiene dominios en oferta, aprovecha ahora y registra tu dominio por un año con un precio super rebajado.
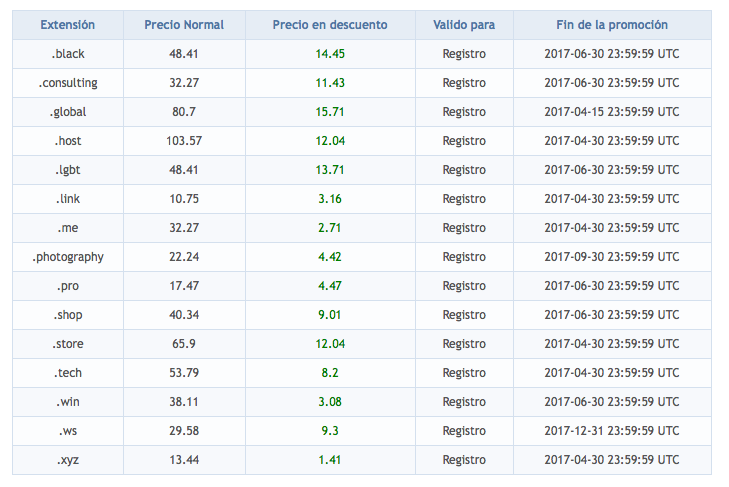
Source: Aprovecha ahora con estos precios para dominios! | MkzHost
![]()
MkzHost tiene dominios en oferta, aprovecha ahora y registra tu dominio por un año con un precio super rebajado.
Source: Aprovecha ahora con estos precios para dominios! | MkzHost
![]()
(Repost from old blog)
Python have several modules that help you to achieve your goals. This week, on my spare time that is getting every day more scarce I spend time figuring out how to create a Python Web Server, I was planing to use it over an application that I’m developing on ICT Consulting. At the end I didn’t use it because I didn’t want a “passive” communication, but probably I will use this code on the CRM Desktop application that we use here.
Anyway, this code may be helpful for you too. I found that creating a small web server is really simple, It starts getting bigger as you add functions to that web server, but the basis is quite simple.
import os
import cgi
import sys
from BaseHTTPServer import HTTPServer, BaseHTTPRequestHandler

class customHTTPServer(BaseHTTPRequestHandler):
        def do_GET(self):
                self.send_response(200)
                self.send_header('Content-type', 'text/html')
                self.end_headers()
                self.wfile.write('<HTML><body>Get!</body></HTML>')
                return

        def do_POST(self):
                global rootnode
                ctype,pdict = cgi.parse_header(self.headers.getheader('Content-type'))
                if ctype == 'multipart/form-data':
                        query = cgi.parse_multipart(self.rfile, pdict)
                self.send_response(301)
                self.end_headers()
                self.wfile.write('Post!')


def main():
        try:
                server = HTTPServer(('',8080),customHTTPServer)
                print 'server started at port 8080'
                server.serve_forever()
        except KeyboardInterrupt:
                server.socket.close()

if __name__=='__main__':
        main()
There are two main methods in our small server: do_GET and do_POST, you can figure out what this methods do. Get is quite simple, Post is used to send data to the server, as an example, the file uploading. This is done via POST and many times using “multipat/form-data” as the content type. The Post method here handles that.
Now that you have a custom server, how can you check it?, well, to check GET you can call it from the web browser. For the POST stuff, you can create a simple web form and using your web browser as “action” on it. However, this code can help you:
import urllib2
import urllib
import time
import httplib, mimetypes

HOST = '127.0.0.1'
PORT = '8080'

def post_multipart(host, port, selector, fields, files):
        """
        Post fields and files to an http host as multipart/form-data.
        fields is a sequence of (name, value) elements for regular form fields.
        files is a sequence of (name, filename, value) elements for data to be uploaded as files
        Return the server's response page.
        """
        content_type, body = encode_multipart_formdata(fields, files)
        h = httplib.HTTP(host, port)
        h.putrequest('POST', '/cgi-bin/query')
        h.putheader('content-type', content_type)
        h.putheader('content-length', str(len(body)))
        h.endheaders()
        h.send(body)
        #errcode, errmsg, headers = h.getreply()
        h.getreply()
        return h.file.read()

def encode_multipart_formdata(fields, files):
        """
        fields is a sequence of (name, value) elements for regular form fields.
        files is a sequence of (name, filename, value) elements for data to be uploaded as files
        Return (content_type, body) ready for httplib.HTTP instance
        """
        BOUNDARY = '----------ThIs_Is_tHe_bouNdaRY_

Did you like this?, don't forget to share!

        CRLF = '\r\n'
        L = []
        if fields:
                for (key, value) in fields:
                        L.append('--' + BOUNDARY)
                        L.append('Content-Disposition: form-data; name="%s"' % key)
                        L.append('')
                        L.append(value)
        if files:
                for (key, filename, value) in files:
                        L.append('--' + BOUNDARY)
                        L.append('Content-Disposition: form-data; name="%s"; filename="%s"' % (key, filename))
                        L.append('Content-Type: %s' % get_content_type(filename))
                        L.append('')
                        L.append(value)
        L.append('--' + BOUNDARY + '--')
        L.append('')
        body = CRLF.join(L)
        content_type = 'multipart/form-data; boundary=%s' % BOUNDARY
        return content_type, body

def get_content_type(filename):
        return mimetypes.guess_type(filename)[0] or 'application/octet-stream'

def test():
        print  post_multipart(HOST, PORT, 'markuz',
                                        ( ('username','markuz'),  ('another_field','another value')),
                                        (('query','query','Query'), ),
                                   )

if __name__ == '__main__':
     test()
Did you like this?, don’t forget to share!
![]()
(Reposted from the old blog)
This time I’m going to talk about putting an image as the application background in Gtk. In Gtk we are used to leave the colors of the application to the theme, but sometimes we will need to use an image as background. I already wrote how to draw a pixbuf in a gtk.DrawingArea (Esp), we could use that, but we will “draw” directly on the widget window instead.
Yes, I said the widget’s window instead the widget itself. You should know that every widget that has been packed in a container has a gtk.gdk.window object and is the responsible for containing your widget. Well, we can draw on that object.
What we need is to create a simple gtk.gdk.Pixbuf and call the gtk.gdk.window.draw_pixbuf method using your widget.window object on the expose-event.
The code should look like this:
#!/usr/bin/env python
import gtk

def draw_pixbuf(widget, event):
        path = '/home/markuz/wallpapers/WMwall1024x768.gif'
        pixbuf = gtk.gdk.pixbuf_new_from_file(path)
        widget.window.draw_pixbuf(widget.style.bg_gc[gtk.STATE_NORMAL], pixbuf, 0, 0, 0,0)

window = gtk.Window()
window.set_title('Drawing Test')
window.set_size_request(640,480)
window.connect('destroy',gtk.main_quit)
hbbox = gtk.HButtonBox()
window.add(hbbox)
hbbox.connect('expose-event', draw_pixbuf)
button = gtk.Button('Press Me!')
hbbox.pack_start(button, True, False, 10)
window.show_all()

gtk.main()
And the result should be like this:
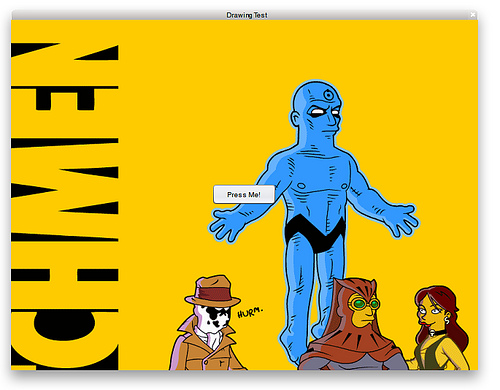
Putting an image as background in Gtk
It is just a window with an HBoxButton as container and a Button in the middle. The button draws normal, but the HButtonBox is drawing its gtk.gdk.window with a pixbuf.
![]()